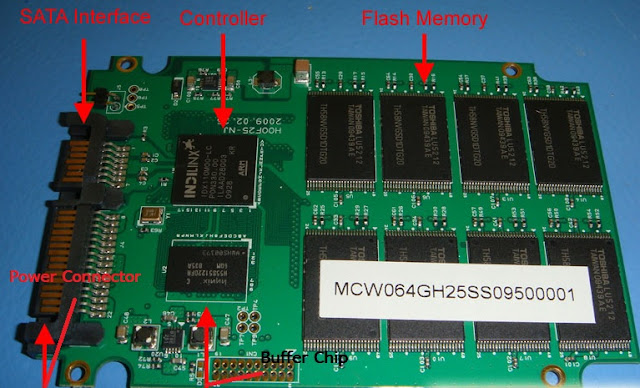
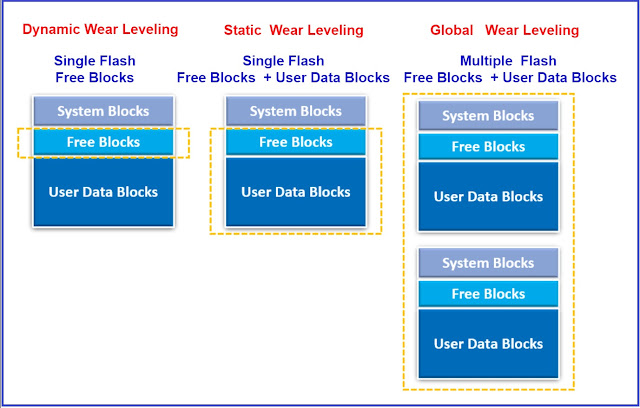
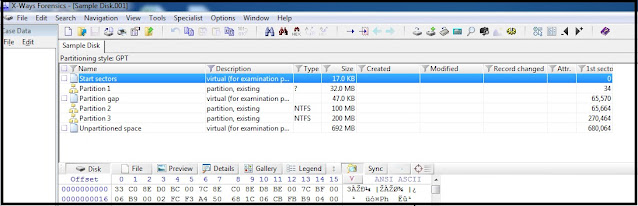
SSD Forensics Challenges (Part-2)

SSD Forensics Challenges (Part-2) အပိုင်း (၃) SSD Over-Provisioning SSD တွေမှာ Wear-Leveling ကြောင့် SSD ရဲ့ Life Span ကိုတိုးစေပါတယ်။ SD တိုင်းမှာ Over-Provisioning လုပ်ဖို့အတွက် Storage အပိုပါပါတယ်။ ဥပမာ SSD 256 GB မှာ 256 GB ထက်ပိုတဲ့ Storage ပမာဏပါဝင်ပါတယ်။ အပိုပါတဲ့ Block တွေက Over-Provisioning Area တွေဖြစ်ပါတယ်။ အဲဒီ Area တွေက Operation System မှာ မပေါ်ပါဘူး။ User ကလဲမမြင်နိုင်ပါဘူး။ SSD Controller ကနေပဲ တိုက်ရိုက် ထိမ်းချုပ်ထားတာဖြစ်ပါတယ်။ ဥပမာ Trime ON ထားတဲ့ Computer ထဲကနေ မလိုအပ်တဲ့ Data အချို့ကို ဖျက်လိုက်တယ်ဆိုရင် SSD Controller ကနေ ဖျက်လိုက်တဲ့ Data တွေရှိတဲ့ Block ကို Trim လုပ်လိုက်ပြီး Data တွေကမလိုအပ်တော့ဘူးဆိုပြီးသတ်မှတ်လိုက်ပါတယ်။ Block ထဲက မလိုအပ်တဲ့ Data တွေကို Erase လုပ်ဖို့အတွက် SSD ရဲ့ Background Process ဖြစ်တဲ့ Garbage Collection ရဲ့ Queue List ထဲကိုထည့်လိုက်ပါတယ်။ အဲဒီအခါမှာ ခုနက မလိုအပ်တဲ့ Block ထဲက Data တွေက Over-Provisioning Area ထဲကိုရောက်သွားပါတယ်။ Garbage Collection Queue List ထဲမှာရှိတဲ့အတိုင်း မလိုတဲ့ Data တ...